30 inspirational mood boards and tips to create your own
A mood board, also called a ‘concept board’, ‘vision board’ or ‘inspiration board’, is a physical (or digital) collage of colour palettes, textures, illustrations, and styles – a compilation of inspirational elements – to capture and convey a design concept or direction, usually with a particular space in mind.
A mood board is a useful and versatile device to showcase the elements of a design proposal; a way to visually map the style and establish the aesthetic feel of a design, to give the client an idea of what the finished scheme will look like and to allow you both to tweak and refine the visual direction before proceeding to the next stages of the design process. A mood board is presented in broad strokes; it allows the designer to elicit feedback before too much effort is invested in the wrong design direction, keeping revision cycles to a minimum. It provides a ‘palette upon which the finished scheme is mixed and refined’.1
Slideshow
How to Prepare…
(1) Compile mood books, boxes or pinboards

Collect beautiful colour swabs, fabric swatches, wallpaper samples, paint chips, carpet swatches, fabric trims, and pictures that really catch your eye and organise them in scrapbooks or ‘mood boxes’ or on a pin-board, as a go-to resource when the time comes to summon specific creative inspiration.
(2) Separate styles from finishes
It may be helpful to start out with two boards – a concept board to help you define the style and a samples board for materials and finishes – before attempting to bring the two together.
(3) Encapsulate the brief in a few key words
Based on your understanding of the client’s tastes and preferences, distil the desired mood to a short list of adjectives which can serve as guidelines to keep you on track as you curate the elements of your collage. Some example tags might be:
- slick, glossy, glamorous, modern, impact, contrast, polished
- dark, masculine, minimal, urban, solid, serious, luxurious, smooth
- rich, layered, elegant, classic, accessories, curves, sophisticated,
- soft, muted, natural, warm, wood, Scandinavian, subtle, light
- minimal, sharp, clean lines, fresh, modern, chic, grey, refined, subtle
- clean, bright, uncluttered, calm, airy, inviting, trendy, spacious, contemporary
- industrial, raw, metallic, retro, functional, monochrome, material, polished,
- rustic, organic, relaxed, minimal, natural, stone, texture, nostalgic, eclectic
(4) Aim for unity

Make sure you settle on a unifying style before compiling your mood board. Filter out any elements that don’t fit your co-ordinated theme. Be ruthless. If elements are difficult to reconcile with the overall appearance, the finished design scheme probably won’t look any less chaotic. Put them quietly aside for another project on another day.

(5) Tailor the board to the client’s approach
Consider whether the client is a broad-brush, big-picture thinker for whom a loose collage will be enough to convey the general look and feel, without you having to make early selections for every aspect of the scheme; or whether they are detailed-oriented and would prefer a more formal approach and a more refined mood board.
(6) Set yourself a time limit
Be prepared to compile and present more than one mood board to convey alternative designs, which should be different enough to be distinctive, but set yourself a time limit (say, 1-3 hours) to prepare each mood board, and stick to it. Remember, at this stage in the design process, it’s not about perfection; it’s about capturing and conveying the mood and character of a scheme.
(7) Determine the format

(8) Keep it loose
Although your theme should be obvious, keep the ideas fluid and not too finalised, so that the client doesn’t feel constrained to either accept a fait accompli or ask you to go back to the drawing board.
How to Compile …
(9) Start with a floor plan
It’s not compulsory, of course, but a floor plan or furniture placement plan is a really helpful way to start mapping out a room and is a popular feature.
(10) Identify your key inspiration
Your most inspirational item should be your first pick; that’s your reference piece. It may be an image of an area rug, or a swatch of curtain fabric that you love, or it may be some image or artefact entirely unconnected with interior design but which encapsulates the mood and character of the scheme. Place it prominently and use it to guide and inspire your other selections.
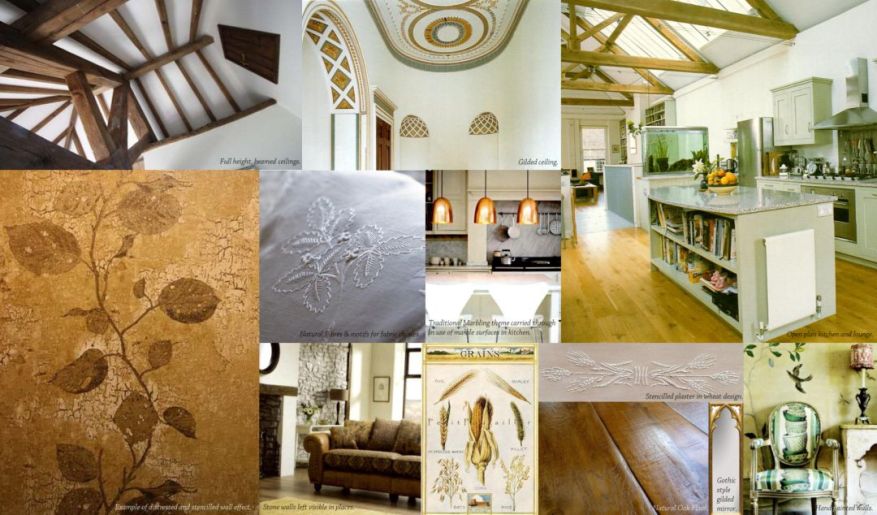
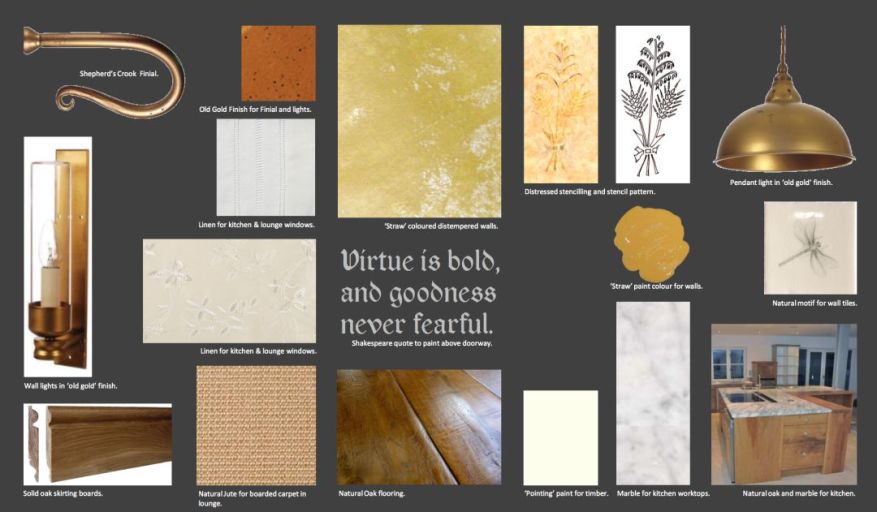
(11) Use key theme images
Use a small number of key theme images and surround these with smaller supporting images, swatches and samples which enhance and clarify the theme in your key images. You may find it helpful to include images of existing features in the space which will form part of the new scheme (e.g. fireplace, cabinetry), if you can.
(12) Group your items
Group items on the board which will be sited together in the finished scheme so you can see what works well together. So, for example, mount images of soft furnishings next to swatches of the fabric you propose to upholster them in, mount swatches of sofa fabric close to fabric swatches for the cushions that will be placed on it, and show a carpet swatch or image of an area rug next to the flooring sample.
(13) Mind your sample sizes
For a balanced board, it’s helpful to size your swatches roughly in proportion to how much of them will be on display in the finished scheme. Using bigger swatches of curtain and sofa fabrics and smaller swatches of cushion fabrics will give a more realistic idea of the overall balance of the design. It’s ok to use small swatches for plain fabrics, but don’t skimp on fabrics with a large pattern repeat or it will be impossible to visualise how it will look in the finished scheme.
(14) Add some explanations
Although it is said that pictures (and swatches!) paint a thousand words, don’t under-estimate the power of text. A few short descriptions, or even one-word labels, can enhance and clarify ideas that your sketches and samples can’t communicate by themselves.
(15) Line up your presentation materials
Traditionally, physical mood boards are mounted on a foam core board (black, white or off-white) or heavy card. To cut the board, use a hand-held straight board cutter or a channel rail (you can buy these online). You could use double-sided poster tape to mount most materials on your board, including tiles. If you choose to use glue, use a glue that dries flat (such as Yes! paste) so that the surface of your fabric samples will be smooth on the board, and not bubbled.
(16) Make life easy
For digital mood boards, professional designers use software such as Adobe Photoshop or Illustrator, but PowerPoint or even Word will also does the trick. It is worth trying out several virtual mood board apps and sites like Morpholio, SampleBoard, GoMoodBoard, MyDeco, Olioboard, or Polyvore to see what suits you best.
(17) Test your board
Test out your board on colleagues or friends before presenting it to the client. If you get too many questions about what an image means or how it relates to the theme, welcome this as a timely signal that you need to do some tweaking to clarify the message.
(18) Get snappy!
If you’re compiling a physical board, take a picture of the finished article (and print it) to carry around with you for handy reference.
How to Present …
(19) Explain the mood board
Explain how the mood board fits in to your design process and what you hope to get out of the review in terms of feedback. Explain the inspiration and thinking behind each of your boards, making it clear how each mood board has evolved from the client’s own input.
(20) Invite feedback
Explain that nothing on the board is set in stone; the mood board is simply intended to focus the mind on the elements of the design and anything and everything is up for review. Emphasise that this is the best (and cheapest) time to suggest refinements, or even a complete re-think, before any commitments to spend.
(21) Let the client live with the mood board
Leave the mood board with the client for an agreed period before your next scheduled review meeting, to allow time for them to familiarise themselves with the scheme in situ.
(22) Be careful what you ask for!
To elicit specific feedback on particular elements, and to avoid prompting the “I’ll-know-it-when-I-see-it” client to request a carte blanche re-design because the mood board doesn’t replicate what they envisaged in their mind’s eye, avoid asking totally open-ended questions. Encourage them to focus on the specific elements. Instead of, “What do you think?”, ask “How do you think this or that element will work within the overall scheme?”
1 Dodsworth, p.136
Sources
Dodsworth, Simon (2016) The Fundamentals of Interior Design, 2nd edition
Nissan, LuAnn, Ray Faulkner & Sarah Faulkner (1994) Inside Today’s Home, 6th edition
Nielson, Karla J. & David A. Taylor (1994) Interiors: an introduction, 2nd edition
